Purple irises at Ivy Green: Paula Kelley, Jenia Bradford maintain ground at the historic home
By Chelsea Retherford | Living 50 Plus
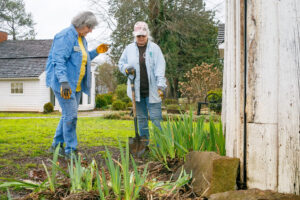
Master Gardeners Paula Kelley and Jenia Bradford have been members of the program long enough to find areas they specialize in, but both gardeners credit Betty and Dennis Balch for building the Shoals Association into the organization it is today.
Bradford said the Shoals Master Gardeners owe some of their biggest ongoing projects, like the association’s efforts in maintaining the grounds at Ivy Green in Tuscumbia, to Betty Balch.
“She can tell you where all these plants came from and why they planted them, because she did all the research on the history of this place to determine what to plant here,” Bradford said.
Kelley agreed.
“Betty was fantastic, and she was really dedicated to her research,” Kelley said. “She came in and knew what would be planted here when the Keller family was here. That’s why we have Kate’s garden between the house and the little house. A lot of things that still grow here are things that Betty found that would be indicative of that time.”
Kelley, who specializes in native plants, said she learned the bulk of her expertise from the Balches.
She and Sue Pilkilton, the executive director of the historic Helen Keller home, said the purple irises that bloom in beds around the home place were first brought to the property by Helen Keller’s niece, Patty Tyson Johnson.
Kelley listed several ornamentals, like oakleaf hydrangeas, coneflowers, and Lamb’s-ear, that are native to Alabama and will thrive and multiply in the region for generations.
The irises planted by Patty Tyson Johnson years ago had multiplied so much, the Shoals Master Gardeners have propagated the flowering plants every four years or so to prevent crowding.
Flowers taken from the beds are often transplanted to other areas on the grounds. Sometimes, there are enough leftover bulbs to share with area residents through the annual Master Gardener’s plant sale, which is the volunteer club’s largest fundraiser.
“About every three or four years, you need to kind of redo the bed. You take out some and pass them along,” said Kelley, who admits she enjoys sharing plants, sprouts, and seedlings as much as she loves sharing gardening tips.
Master Gardener Lisa Maples joined Kelley and Bradford at Ivy Green this February to help thin one of the iris beds that had stopped producing the purple flowers.
“You see they’re so close,” Maples pointed to a group of plants in the bed. “They’re close together, and the center gap here means that’s where one started. The ‘mother’ has caused all these babies (sprouts), and then the mother dies.”
Though Maples is also a veteran grower, she said she never knew iris mother bulbs needed to be discarded before transplanting the new sprouts back to the flower bed until recently attending a lecture at the University School of Jackson in Tennessee.
Maples said the lecture was led by former Lauderdale County Extension Home Grounds Agent Taylor Reeder, who explained that at the center of the iris rhizomes lies the mother.
“Everybody tries to break them all apart and replant the middle,” Maples said. “The middle one is done. That’s why I couldn’t ever get the thing to grow. You just break it off. Even if you see it’s got roots. You might think, oh it’s going to do something. No, Taylor taught us that it’s not going to do anything.”
While the Master Gardener group began propagating the bed in February, Maples said home gardeners can transplant their irises any time during the year. But she doesn’t recommend taking on the task in the middle of a North Alabama summer.
“The dead of summer is probably not the best time. They’re going to suffer and you’re going to suffer because you’re out here digging irises,” she said.
Most of the time, a tell-tale sign that a flower bed needs propagating is when the plants begin to lose their blooms, or aren’t thriving as much as they typically do in the growing season, Maples said.
She added that most ornamentals with tubers, like irises and oakleaf hydrangeas, are propagated in similar ways.
Pointing to an oakleaf plant near the stage at Ivy Green, Maples explained that “runners” or branches off the mother plant will develop roots of their own underground.
To propagate the runner, she said gardeners make a cut with some pruners on the side of the branch still connected to the mother. Then they dig up the roots and the sprouting branch to plant in another bed.
“We just need to make sure we don’t hurt the main root of the plant,” Maples said. “You go in and thin them out. They just grow, like gangbusters. They love the shade.”
While some plants do not like being disturbed, Maples and Kelley said native plants with rhizomes or bulbs are typically easy to propagate and transplant.
“Azaleas are similar, but they’re not easy,” Maples said. “If you’ve got any azaleas that have branches on the ground, you can propagate them and plant. They’re one of the hardest ones to do, but it can be done. They’re finicky.”
While azaleas are native to the area, Kelley said many non-native plants can be “finicky” in a Southern environment too.
“You do need to look at that,” she said. “Are you falling in love with something that’s only going to live in Michigan? You’re probably not going to succeed with it.”
How To Propagate Irises
If you’re a beginning gardener and want to learn some basic propagation, you can follow the steps laid out by the Shoals Master Gardeners as they worked in the irises this spring.
If you have questions about another plant, or want to learn more about becoming a Master Gardener, the club members recommend visiting www.aces.edu, or contacting the toll-free Master Gardener Helpline at 1-877-ALA-GROW.
According to Master Gardener Lisa Maples, it’s time to propagate your bed of irises when the area becomes too crowded, and the flowers are no longer blooming. It’s a good gardening practice to propagate the flower bed once every three or four years.
STEP ONE: Work the soil loose and pull the irises, which often grow in systems of two or three bulbs, up from the ground.
“When you have two or three connected like this, that’s when you should consider propagating,” Maples illustrates. “You also notice, they’re sitting almost on top of the ground. We’ve not really dug anything.”
As irises do not need much soil to thrive, most of the plants are easily extracted from the bed without much effort. Occasionally, when Maples struggles to lift an iris, she picks up a small spade to further break up the topsoil.
STEP TWO: Separate bulbs that have grown together by “tickling apart” the roots systems, Maples said.
Whenever you find two or three bulbs connected, and one of the bulbs is not producing any leaves — although roots may be protruding from rhizome — this indicates an iris mother has completed her life cycle.
STEP THREE: Discard the mothers.
“That’s the part that is not (producing) anything,” Maples said. “You just break it off. They’re very tender now. I’m not having to cut them apart with a knife.”
Maples said mothers can be snapped off the thriving sprout where the rhizomes meet at a joint.
PRO TIP: If you aren’t planning on returning young bulbs back to the bed or transplanting any to another bed right away, Maples said the iris sprouts can be stored in a cool, dry space for no longer than a week or two.
“If it’s freezing, you’d have to cover them up,” added Master Gardener Paula Kelley. “Put them in a box and under shelter. You don’t want the cold getting to them, and you don’t want them drying out in the sun.”
Maples said the roots need air to prevent rot.
If you’re planning on transporting a few sprouts to a friend, Maples and Kelley recommend adding a little soil to the storage box, or wrapping the rhizomes in newspaper.
“I might even pot them up. These are good pass-along plants,” Kelley said.
STEP FOUR: Prepare the flower bed by further breaking up the soil. If transplanting, be sure to break up the soil in the new area as well.
Maples said irises are hardy plants that can thrive in almost any spot, but you can expect fuller blooms if you select a flower bed with plenty of sunlight.
Take care to remove any weeds and grass, Master Gardener Jenia Bradford said, adding that the new bed doesn’t have to be very large.
“I’m just going to plant a few down through here. They will multiply,” she said. “When you plant one, next year, you’ll have three. They’re not invasive. They grow in a kind of clump.”
PRO TIP: Although the Master Gardeners skipped this step at Ivy Green, Bradford said she often trims yellowing or brown leaves in her iris beds as she is preparing to propagate.
“I trim all the brown places off,” she said. “They’ll put on new leaves and grow back just as they were. They’re really tough plants.”
STEP FIVE: Replant the sprouts, just covering the rhizomes and roots up to the leaves.
Maples said the rhizome does not have to be fully submerged to grow, but it’s a good idea to add a small amount of soil to stabilize the plant.
“You don’t want to drown your iris by giving it too much soil,” she said. “The first instinct is to dig and get it in deep. Then you end up rotting the plant away. You want to put them back as they were originally — no deeper than they were when they came out of the ground.”
Maples and Bradford said the irises should be replanted about three to four inches apart to give the plants room to spread.
PRO TIP: As Bradford replanted the irises, she placed three several inches apart in a triangle formation.
“This is the way Betty (Balch) taught us,” she said. “We plant mostly annuals in triangles. They look better. As they grow, they don’t crowd each other, but they fill in.”
OPTIONAL STEP SIX: Finish the bed by adding mulch like pine needles around the irises to prevent grass and weeds from invading the bed.
